MARCH 13, 2019 BY MARINA C
The Payment Services User (PSU) journey with Payment Initiation Service Provider (PISP)
Further to the previous publication I will continue to share with you our experience within the PSD2 and Open Banking standards. So far, we have been developing a number of components – fully functional applications capable to illustrate the customer journey within the PISP and AISP.
In this article, I will focus on the progress we have made to learn the Open Banking standard as we have developed white label application for the Payment Initiation flow.
The scenario we looked to implement was to start from a Merchant (e-commerce site) and provide the end-user with the option to pay for his/her order by choosing bank via a TPP (Third Party Provider) that supports an Open Banking standard.
Thus, in order to reproduce the entire Payment Initiation chain, we have developed fully functioning applications for the main tree businesses entities:
- Merchant eCommerce (FinTech Commerce) web site.
- Third Party Provider (TPP) – Payment Initiation Service Provider, named in this article FinInsightsPSD2 as well.
- Bank Simulator (including authentication and authorization flows) – Account Servicing Payment Service Provider (ASPSP), named in this article
FinTech Bank as well.
All the business entities have their own web application and a back-end service. The flow is a combination of interactions between the PSU with each of the business services via a web browser application and service-to-service interaction via a back-end channel.
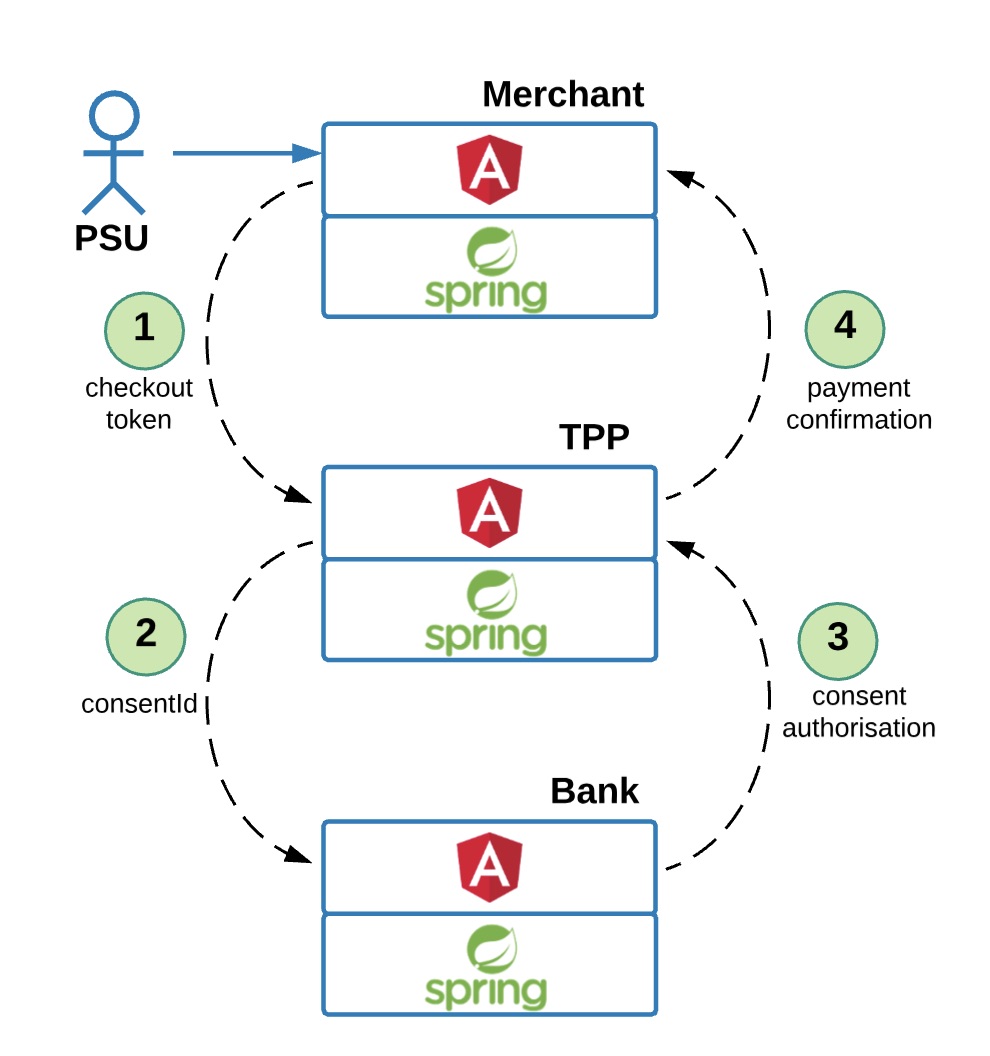
The high-level diagram below illustrates the business flow of a Payment Service User (PSU) when he/she has chosen to pay for services via a PISP TPP.
So, what does that exactly mean and how it works?
The diagram depicts a macro view of the PSU journey:
- From his/she first interaction point on the Merchant side (step 1),
- Through payment initiation request on the Third Party Provider (TPP) side (step 2),
- To authentication to completion on the Account Servicing Payment Service Provide (ASPSP) side/Bank (step 3),
- And then his redirection back to Merchant web site (step 4).
Well, let’s see how it works in practice and let’s give some names to the entities.
PSU accesses the merchant e-Commerce web site (let’s call it FinTech Commerce), there he can select goods he is interested in and add them to his Shopping Cart. In this case we have reproduced a simplified online shopping journey with a product catalogue from which the user can select to add to the cart and the amount. It is an interactive user experience, which you can see in most of the online businesses working in retail industry and we expect the end-user to be accustomed with.
Once the user is happy with the contents of his Shopping Cart, he is happy to proceed to Checkout. The checkout process has also been developed to ask for minimum details keeping in mind the Open Banking requirements for payment initiation. As such, we have designed the checkout form for the user to provide the required details for billing and shipping addresses and then, the most important and new feature: he can select to pay for his goods with the TPP, directly from his bank account.
So, PSU still being on the Merchant web site, can now select from the Payment options the newly added Open Banking payment service – TPP. Let’s call it “FinInsightsPSD2” to keep it simple.
By selecting this alternative option to make a payment, given user is comfortable to make payments direct from his bank account, he gives his consent to the Merchant to use a TPP (in this case FinInsightsPSD2) to initiate the payment by agreeing with the T&Cs.
Once the user has selected the PSD2 payment option and continue, a confirmation page is being displayed with the summary of his order, the billing and shipping addresses, the total amount to be paid and the name of the TPP to help him make the payment (FinInsightsPSD2).
Once the user clicks the payment confirm button there are few things that happen in the background. For this particular example we have implemented a secure checkout model in which the Merchant initiates a back-end call to the TPP to authenticate itself and initiate a payment intent by providing enough details about the order and the amount to be paid.
The TPP will create a payment order and issue a random temporary token that will be associated with the payment intent. Let’s call that token “checkout token”.
Once the Merchant service has received the checkout token, the user browser is redirected to the TPP web site to continue the payment journey.
In the next step [step 1 in the diagram], the TPP web application retrieves the payment order, displays the order details, including the Merchant details and provides the user with the options to select an ASPSP/bank to make the payment with. The user selects the appropriate bank and gives his consent to the TPP to initiate the Payment Authorisation with the selected bank.
In this particular example the PSU can select the “FinTech Bank” Bank Simulator, the third application developed by FinTech Security.
The user now is redirected to the bank’s page for payment authorisation (step 2 in the diagram). Similar to the secure checkout there are a number of steps taking place in the background between the TPP and ASPSP/bank prior to redirect to implement the Open Banking payment initiation.
We will discuss those in one of the next stories, but in a nutshell, the TPP will initiate a payment request with ASPSP/bank, which will provide the TPP with a Consent ID as a result, which is basically a random token generated to identify the payment initiation request later on.
Similar to secure checkout the end-user’s web browser is redirected to the bank’s web application carrying the Consent ID in the request.
In our case we have also developed another application that simulates the Bank’s authentication and payment authorization flows. Let’s call it “Bank Simulator”.
While on the bank’s web site, the user is asked to authenticate itself using his bank credentials in order to authorize the payment with his bank. And again, as per PSD2 requirements, the bank will use Strong Customer Authentication (SCA).
After the successful authentication the user can select the bank account, he is going to make the payment from (step 3 from the diagram).
Being logged in within his bank, and after selecting the desired bank account the user can review the Payment Order details including the information about Merchant account, the amount to be paid, the bank account details from which the payment will be made. In case he is happy with the payment details he can go further with the payment confirming it (still step 3 from the diagram).
Once the confirmation of the payment is done the user is logged out from his bank account / online banking application and is redirected back to the TPP web page.
For journey completeness purposes we have also implemented a page where he is informed that the payment was successful and is given the payment details.
The user is then redirected to the Merchant eCommerce (step 4 from the diagram) to finish the order and receive the order confirmation. We deliberately have skipped the fact that on his way back from bank the TPP and eCommerce application will do back-end calls to receive payment and order confirmation from Bank and TPP accordingly.
This is a bird’s eye view over a generic implementation of a Payment Initiation Service using a web browser.
Now, let’s resume the key points of the whole PSU journey within PISP:
- the PSU (user) starts the journey at eCommerce (Merchant);
- the PSU is redirected to TPP/PISP to initiate a payment request (consent);
- the PSU is redirected to his ASPSP/Bank web application for authentication/authorization;
- once the consent is authorised the ASPSP/Bank redirects the PSU back to the TPP for confirmation and completion of the journey;
- The PSU is then redirected (automatically or interactive) to eCommerce to see the final payment confirmation.
As you can see, the developed Payment Initiation application implements the PSD2 and Open Banking standards journeys.
The intent was to make it complete even if some of the steps could have been optimised for user experience to simplify the journey.
All the Payment Initiation application listed in this example were developed to include two layers/components:
- User Experience – developed in Angular framework and
- Back-end – developed in Java Spring, each deployed in Docker containers.
I will ask the development geeks for the technical details and will share them with you, but it does the job for now.
The back-end application implies multiple integration calls at various stages of the journey between:
- eCommerce and TPP (implementing secure checkout);
- TPP and ASPSP/Bank (implement Open Banking standard, we used v3.0).
Yet, that is another topic I might consider going further with in one of the next articles. Let’s keep discovering! It’s been a journey for me as well!